Write back, Dashboard Commentary, Report Comments and blog type comments are buzz words for a quite significant times in OBIEE reporting world. Believe me my first project about the write back which I successfully presented in 2008 almost 5/6 years back. I have been successful to implement the right back with some of the technical notes available at that time from Oracle Development Team.
This blog is an attempt an attempt to share documentation from my knowledge base which uses OBIEE and Excel to demonstrate a simple write back using Excel and also focuses using Oracle table in later part of the document.
Introduction - Writeback
“Writeback” – presenting an Answers interface so that users can update data in database tables or insert new rows – first appeared in version 7.8.4. To use OBI EE’s “writeback” capabilities, there are several set up steps. While each one is simple and fairly straightforward, it’s easy to forget all the steps and where each one is located. This document contains the instructions in case you find yourself forgetting them. Since many people like to demo using Excel as a data source, it focuses first on using Excel. Later, an example using an Oracle table is also discussed.
Sample Data
Here’s some data from an Excel 2003 workbook. The data includes columns with three different data types: numbers, character, and dates. The data is from a named range called “Data” in the Excel workbook.
Col1
|
Col2
|
Col3Char
|
Col4Date
|
1
|
10
|
Jan
|
1/31/08 0:00
|
2
|
20
|
Feb
|
2/29/08 0:00
|
3
|
30
|
Mar
|
3/31/08 0:00
|
4
|
40
|
Apr
|
4/30/08 0:00
|
5
|
50
|
May
|
5/31/08 0:00
|
6
|
60
|
Jun
|
6/30/08 0:00
|
7
|
70
|
Jul
|
7/31/08 0:00
|
8
|
80
|
Aug
|
8/31/08 0:00
|
9
|
90
|
Sep
|
9/30/08 0:00
|
10
|
100
|
Oct
|
10/31/08 0:00
|
Configure the Excel ODBC Data Source Name (DSN)
Be sure that the Excel ODBC Data Source Name is not configured as Read Only.

Create a Business Model and Presentation Catalog
Create a simple business model to use the sample data that looked like this:

Note that logical column Col1 is defined as the key. This isn’t critical, but if a key exists that maps to a column that is a key in the physical source table, it makes the resulting update SQL easier to write.
Both logical tables “Dim” and “Facts” use the same physical source, which is the Excel “table” (named range) called “Data” defined in the physical layer of the metadata. The physical column “Col1” is the functional key, and it could be shown as the key in the metadata, but it doesn’t really matter if it is or not.

To make it easier to verify that the writeback process is working, disable connection pooling using the checkbox on the Connection Pool properties dialog General tab.

Another tab called “Write Back”. Ignore it. That tab is for other use cases where the BI Server has to write back to the database.
Create a Query with a Table View
Here is the query that will be used to update the Excel workbook. This query includes all the columns from the physical table, but for updates this would not be necessary.

Settle on the query structure, and save it, before going on to the next step.
Create a Write Back Template
The SQL the BI Server will use to generate the updates to the physical table comes from a template you will write. This template, the Write Back Template, is an XML file. For OBI EE versions 10.x, this file should be in the OracleBIData\web\msgdb\customMessages folder. This is true whether IIS or OC4J is the web server being used. The full path and name of this file is OracleBIData\web\msgdb\customMessages\WriteBackTemplate.xml.
<?xml version="1.0" encoding="utf-8" ?><WebMessageTables xmlns:sawm="com.siebel.analytics.web.messageSystem"><WebMessageTable lang="en-us" system="WriteBackTemplates" table="Templates"><!-- Testing templates used for writing back into an Excel workbook used as a data source --><!-- Save this file in the OracleBIData\web\msgdb\customMessages folder as WriteBackTemplate.xml --><WebMessage name= "UpdateExcelData"><XML><writeBack connectionPool="WriteBack"><!-- Table has columns Col1, Col2, Col3Char, Col4Date and in query c0 maps to Col1, c1 maps to Col3Char, c2 maps to Col4Date, c3 maps to Col2--><insert>INSERT INTO Data VALUES(@{c0},'@{c1}',@{c2},@{c3})</insert> <update>UPDATE Data SET "Col2"=@{c3} WHERE "Col1"=@{c0}</update></writeBack></XML></WebMessage><WebMessage name= "UpdateExcelCharData"><XML><writeBack connectionPool="WriteBack"><insert>INSERT INTO Data VALUES(@{c0},'@{c1}',@{c2},@{c3})</insert><!-- Table has columns Col1, Col2, Col3Char, Col4Date and in query c0 maps to Col1, c1 maps to Col3Char, c2 maps to Col4Date, c3 maps to Col2--><update>UPDATE Data SET "Col3Char"='@{c1}' WHERE "Col1"=@{c0}</update></writeBack></XML></WebMessage><WebMessage name= "UpdateExcelDateTime"><XML><writeBack connectionPool="WriteBack"><insert>INSERT INTO Data VALUES(@{c0},'@{c1}',@{c2},@{c3})</insert><!-- Table has columns Col1, Col2, Col3Char, Col4Date and in query c0 maps to Col1, c1 maps to Col3Char, c2 maps to Col4Date, c3 maps to Col2--><update>UPDATE Data SET "Col4Date"= '@{c2}' WHERE "Col1"=@{c0}</update></writeBack></XML></WebMessage></WebMessageTable></WebMessageTables>
The file contains three separate templates i.e. UpdateExcelData, UpdateExcelCharData,and UpdateExcelDateTime. Each template is a separate Web Message name. Each template will be used by a different query to illustrate how to update columns of different data types. I included comments to make it easier to understand the mapping of the logical columns to the physical columns, which makes the SQL update and insert templates easier to understand.
Note that @{c0} means the column in the first position on the Criteria tab. The positional columns are defined at the time you first save the query. If you rearrange column order, (e.g. moving the first column to the second position), the value of n in @{cn} does not change.
Columns that are a character (text) datatype have single quotes around them. Dates or datetime columns also require single quotes around them for Excel. The form of the SQL templates, particularly for datetime columns, will depend on the target database platform.
Configure Table Write Back Properties
Using the query a request is been created and saved, go to the table view and click on the Write Back Properties icon.
When the Write Back Dialog opens, check Enable Write Back and enter the Template Name. The template name is the name of the message in the template file, not the file name itself. Each WebMessage element has a name attribute. In the example above, there are three Webmessage names: UpdateExcelData, UpdateExcelCharData, and UpdateExcelDateTime. For this first query, enter UpdateExcelData. This contains a SQL template for updating a numeric column.
Enter the button text and select the button position.

Set Column Interaction as Write Back
In the Criteria tab, click the properties button on the column you want to update.
On the second tab of the column properties dialog, “Column Format”, select Write Back as the Value Interaction. Enter the field size. Here the field size will hold 6 characters.

Save the query and log out of Answers.
Restart the Presentation Server
The writeback template will not be available to use until after you restart the presentation server. You have to restart each time you change the WriteBackTemplate.xml file.
Log back in and run the query.
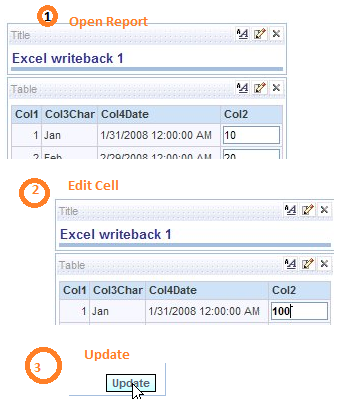
Verify Write Back Is Working
Run the query. The existing data appears. Edit the cell whose value you want to change. The update button.
Open the Excel workbook and verify the change.

Close the Excel workbook. (Leaving the Excel workbook open will cause an error when you try to query it again).
Configure Other Queries to Update Other Columns
After modified the first query and saved two other queries in order to illustrate updating character and datetime columns. Each of these queries uses a separate template: UpdateExcelCharData and UpdateExcelDateTime.
Open the Excel workbook to verify the update occurred.

Open the Excel workbook to verify the update occurred.

Inserts in Excel
The write back Web messages contain both Update and Insert templates. However, you may have noticed, if you looked at the query logs, that Insert statements have never been generated. To generate an insert, the OBIEE checks if the first field that was edited was originally null. If it was, it sets the action to insert rather than update.
One can get this to work in Excel by adding a row into the named range containing the data that has the first column = Null. Since you may not want to have bogus values in the rest of the column, you could set all the columns to null. (Note – adding several null rows with the idea that you might want to insert multiple rows at once probably will not work. The reason is that if the set metadata in the business model causes a group by the un-aggregated columns, the result set will contain only a single null row.)
Filling in values in the null row and clicking the Writeback button in the table view will result in an insert statement. That's the good news.
The Excel will not perform the insert and come back with the error message
The bad news is that in this context, Excel will not perform the insert. The error message will read: "Cannot expand named range..". So Inserts apparently won't work in Excel when the "table" is a named range.
Writeback in Oracle
For demoing inserts we have set writeback in Oracle. The subject area and business model identical to the one used for showing writeback in Excel are designed.
By copying the existing Excel Writeback business model, along with its presentation catalog, and then used the utility to replace the Excel Data table with the Oracle Write back table (the utility is in the ToolsàUtility menu list), this helped to avoid rework.
The following web messages are added into the writeback XML file:
<WebMessage name= "OracleWriteBack"><XML><writeBack connectionPool="orcl SH"><insert>INSERT INTO WRITEBACK VALUES(@{c0},@{c3},'@{c1}', TO_DATE('@{c2}', 'MM/DD/YYYY HH:MI:SS AM') )</insert><update>UPDATE WRITEBACK SET "COL2"=@{c3},"COL3CHAR"='@{c1}',"COL4DATE"= TO_DATE('@{c2}', 'MM/DD/YYYY HH:MI:SS AM') WHERE "COL1"=@{c0}</update></writeBack></XML></WebMessage>
Some of the important notes regarding the template for Oracle Database are as follows
· The column names are upper case, since that is how they exist in the Oracle table and the template encloses them in quotation marks.
· The format mask for the TO_DATE function matches the date format displayed in the table.
· None of the single or double quotation marks are “smart quotes”. Smart quotes will cause the SQL to fail.
Truing off caching for oracle writeback table in the metadata is a must activity.
After creating a query, next step was to edit the writeback properties of the table view in order to use the correct writeback template:

Once report is saved, restart presentation server to make a change to the WriteBack.XML file. The table view for updating and inserting looked like figure 1 below. Note the nulls in the last row. Second view is the same table view after making changes (“Jan” to “January” in the first row) and adding new data to the last row.

Clicking the “Writeback” button generated the Update and Insert statements, followed by a Select statement that updated the table view.
UPDATE WRITEBACK SET "COL2"=10,"COL3CHAR"='January',"COL4DATE"= TO_DATE('1/31/2008 12:00:00 AM', 'MM/DD/YYYY HH:MI:SS AM') WHERE "COL1"=1
INSERT INTO WRITEBACK VALUES(11,110,'Nov',TO_DATE('11/30/2008 12:00:00 AM', 'MM/DD/YYYY HH:MI:SS AM'))
select T26869.COL1 as c1,
T26869.COL3CHAR as c2,
T26869.COL4DATE as c3,
sum(T26869.COL2) as c4
from
WRITEBACK T26869
group by T26869.COL1, T26869.COL3CHAR, T26869.COL4DATE
order by c1, c2, c3
Tables with Keys
One way to solve it to create another data table, called as WRITEBACKNULL, similar in structure to WRITEBACKKEYED but without a key. It contained one row where all the values were null.
After modifying the business model to include WRITEBACKNULL as an additional source and set up fragmentation content so that queries would always use both sources (unless, for some reason, the user selected Dim.Col1 = 1000 or 1001, two non-existent values – but that could also be prevented by fragmenting on a logical column that wasn’t exposed in the presentation layer).

This will produce the null row needed in the table view to bring about an insert.
I hope you find this simple demonstration of the write back useful, I am not a sole writer of the contents of this blog, the relevant text is been copied from various other documents. I don’t see any reason why this writeback should not work with the OBIEE 11g with minor changes, please refer the following writeback blog for 11g.
http://bidirect.blogspot.co.uk/2011/05/writeback-for-dashboard-commentary-for.html
http://bidirect.blogspot.co.uk/2011/05/writeback-for-dashboard-commentary-for.html


