The blog covers incremental RPD and webcat migration and I have already discussed details about the procedures need to be followed for the full migration of repository and webcat in my previous blog.


The Merge Wizard has following steps


Incremental RPD Migration
A. Common Parent
This merge also called a three-way merge, there will be three RPD’s
This merge also called a three-way merge, there will be three RPD’s
- Original.RPD – is one which is the very first starting point of development
- Modified.RPD – is the one which is generally production repository
- Current.RPD – is the one which is generally a development repository
After the merge, a fourth merged repository file is created. These are all relativity time based; it means a RPD which is “Original.RPD” will not be the same after one migration. Once a migration to production happens, then that production RPD will become your original RPD.

I have got three repositories as shown below which are used in following screen snapshots for 3 way merge repository

Steps for 3 way merge of repository are as follows
1. Open the Current.RPD or also known as “development” repository. This repository does have a new column/subject area which needs to merge with production repository (or needs to be migrated over to production repository).


2. Modified.RPD or Production.RPD does not have the new subject area/columns which we have seen in current repository above. Original.RPD also does not have the new subject area/columns.

3. Open current or development repository
Choose File >> Merge which will invoke the Merge Repository Wizard in the Administration Tool, It supports three types of merges, this section talks about Full Merge..
· Full merges – typically used when there are two different repositories that need to be merged. It can be used to import objects from one repository to another.
· Patch merges – used while applying the differential between two versions of the same repository e.g. patch merge ( from development version to production version) or upgrade BI Apps repository
· Multiuser development merges – checking in projects using MUD environment
The Merge Wizard has following steps
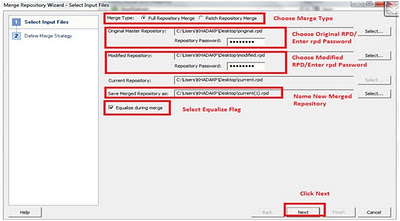
a. Select Input Files – Choose input repositories(files)
Open the RPDs as shown and provide the passwords for respective RPDs and name the new production repository or migration ready repository accordingly. Check “Equalize during merge” flag.
Open the RPDs as shown and provide the passwords for respective RPDs and name the new production repository or migration ready repository accordingly. Check “Equalize during merge” flag.

b. Define Merge Strategy
If there are any conflicts, the Define Merge Strategy screen of the Merge Repository Wizard appears. If there are no conflicts, the Merge Repository Wizard closes. Decision need to be done whether to include or exclude objects from the merged repository.
The Decision choices depend on the type of conflict, examples are as below
· Added to Current – Choosing Current keeps the new object in the merged repository while Modified(D) selection deletes the new object from the merged repository
· Deleted from Current –Choosing Current keeps the repository as it is without adding the object to the merged repository while Modified(A) adds the object back into the merged repository
· Changed in both(Different) – The object was not added or deleted, but at least one of its properties was modified, selection can be done based on property values.

Once it is done, click on Finish, a new repository (new production or migration ready repository) will be created with new subject area/columns added.
B. No Parent
This merge also called a two-way merge, is useful for importing objects from one repository to another. The objects are merged from two different repositories with no parent. There will be three RPD’s
This merge also called a two-way merge, is useful for importing objects from one repository to another. The objects are merged from two different repositories with no parent. There will be three RPD’s
- Blank.RPD – If there is no precedent repository exists, then create a new blank repository for merging the current (development) and modified (production) repository.
- Modified.RPD – is the one which is generally production repository
- Current.RPD – is the one which is generally a development repository
These are all relativity time based. Means a RPD which is Original.RPD will not be the same after one migration. Once a migration to production happens, then that production RPD will become your original RPD.


1. Create a blank.RPD by using create new repository wizard.


2. Open the Current.RPD or also known as “development” repository. This repository does have a new column/subject area which needs to merge with production repository (or needs to be migrated over to production repository).

3. Open current or development repository
Choose File >> Merge which will invoke the Merge Repository Wizard in the Administration Tool.

Choose File >> Merge which will invoke the Merge Repository Wizard in the Administration Tool.
The Merge Wizard has following steps
a. Select Input Files – Choose input repositories(files)
Open the RPDs as shown and provide the passwords for respective RPDs and name the new production repository or migration ready repository accordingly. Check “Equalize during merge” flag.

Open the RPDs as shown and provide the passwords for respective RPDs and name the new production repository or migration ready repository accordingly. Check “Equalize during merge” flag.

b. Define Merge Strategy
If there are any conflicts, the Define Merge Strategy screen of the Merge Repository Wizard appears. If there are no conflicts, the Merge Repository Wizard closes. Decision need to be done whether to include or exclude objects from the merged repository.

Once it is done, click on Finish, a new repository (new production or migration ready repository) will be created with new subject area/columns added.
RPD Patching
In this process, we will create XML patch file by comparing the current or development repository and then this patch file will be applied to the target repository in comparison with original repository and modified or prod repository along with xml patch file.
Generate XML Patch
This process compares the current or development repository to the original repository.

1. Open current or development repository
Choose File >> Compare which prompts to choose the original repository which needs to be compared and click to open.

2. The selection will pop up the compare repositories window as shown below. Click on “Equalize” if needed and then click on “Create Patch”. On prompt, provide a name and save it in the folder of your choice.

The generated XML file will be as shown below

Apply XML Patch
The process to apply patch is as below

1. Open current or development repository
Choose File >> Merge which will invoke the Merge Repository Wizard in the Administration Tool. The Merge Wizard has following steps
a. Select Input Files – Choose input repositories(files)/ Patch File
Open the RPDs as shown and provide the passwords for respective RPDs and name the new production repository or migration ready repository accordingly. Open XML patch file.

b. Define Merge Strategy
If there are any conflicts, the Define Merge Strategy screen of the Merge Repository Wizard appears. If there are no conflicts, the Merge Repository Wizard closes. Decision need to be done whether to include or exclude objects from the merged repository.
Click on Finish, it generates the repository with patch applied.
Apply Patch - Command Line Utility
biserverxmlexec -P repository_password –I xml_patch_pathname –B base_repository_pathname –O output_repository_pathname
Example of parameter values from the sampleApp installation:
-P Admin123
-I LEGACY_XML.xml
-B SampleApp.rpd
-O SampleApp.rpd
Note - The command line utility for apply patch should update the rpd in an offline mode.
Incremental Catalog Migration
In this process, we will create XML patch file by comparing the current or development repository and then this patch file will be applied to the target repository in comparison with original repository and modified or prod repository along with xml patch file.
Archive – Catalog
1. Go to Oracle Business Intelligence > Catalog Manager to lunch Catalog


2. Open Catalog - File >> Open Catalog , either in Online or Offline mode , provide the path, login credentials and click on OK.


3. Once the catalog manager is expand the catalog and then select the “shared folder” as shown below and then go to File >> select Archive


4. A popup window appears. Click on “Browse” and then provide name you want to save this archive and then click on “open”. Once it is done name appears as shown and then click on “Ok”.


5. Once it is successful click on “Ok” and a file will be created in the folder shown.


OBIEE HOME >> instances >> instance4 >> bifoundation >> OracleBIPresentationServicesComponent >> coreapplication_obips1 >> catalogmanager >> mycatalog_archive
Archived file is shown below


Un-Archive – Catalog
1. Open Catalog - File >> Open Catalog , either in Online or Offline mode , provide the path, login credentials and click on OK.
2. Once the catalog manager is expand the catalog and then select the “shared folder” as shown below and then go to File >> select unarchive


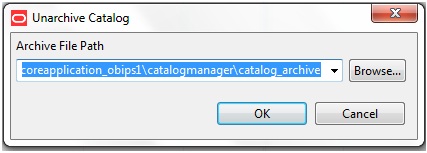
3. Click on Browse and select the file which you want to un-archive and then finally click on OK. Once done successfully click OK.

4. Refresh the Analytics browser
Hi,
ReplyDeleteThank you very much for your good and detailed information. Your blog is very good compare to others it is very easy to understand every topic with detaild screenshots.
I request you if you have time could you please explain the OBIEE 11g Architecture with detaild steps and How to work each components and directions.
Regards,
Giri
ReplyDeleteThis post is really nice and informative. The explanation given is really comprehensive and informative.I want to share about oracle obiee training and angular training