In my previous blog entries I have written about the Times Ten in-memory database (IMDB) 11.2.2 and Oracle In-Memory Database Cache 11.2.2 and its integration with OBIEE.
Oracle Exalytics is a new beast in the market, which provides extreme performance of Business Intelligence and Enterprise Management applications. Oracle Exalytics runs the Oracle Business Intelligence Foundation along with Oracle Times Ten In-Memory Database for Exalytics. Both BI Foundation and Times Ten In-Memory Database for Exalytics have been specifically enhanced to work together and have been optimized to provide exclusive features on Oracle Exalytics hardware.
The Oracle Essbase – multidimensional OLAP Server is also one of the important constitute of Oracle’s journey of Exalytics. For Exalytics, Oracle Essbase has a number of optimizations for in-memory operation including improvements to overall storage layer performance, enhancements to parallel operations, enhanced MDX syntax/ MDX query engine.
This blog is attempt to document step by step installation of Essbase with enough details. I would like to explore the new exciting world of Exalytics in near future through successive blogs entries.
Steps to install the Oracle Essbase Release 11.1.2.1.0 are as follows
1. Download the software from OTN
For this blog entry I have downloaded and installing the 64 bit version on my laptop.
Essbase download includes
· Oracle Essbase Server and Clients
· Oracle Essbase Administration Services and Client
· Oracle Provider Services
· Oracle Essbase Integration Services and Client
· Oracle Essbase Studio and Client
· Oracle Essbase Spreadsheet Add-in
After downloading all required download files, it should have following files.

2. Extract contents from the downloaded zip files
Extract all zip file in one folder D:/Install, it should have following folder structure. The ‘assemblies’ subdirectories contain the actual installation components.

3. Preparation of Database
Database using a supported RDBMS (Oracle Database, Microsoft SQL Server, or IBM DB2) is must. EPM System supports 32-bit as well as 64-bit versions of all supported databases; however, the version of the database should match the operating system e.g. 64 bit operating system with 64 bit database version.
The database must be created using Unicode Transformation Format UTF-8 encoding (character set).
Oracle SQL to check if the database parameter is UTF-8 or not is as below
select * from nls_database_parameters where parameter='NLS_CHARACTERSET'
Oracle database user ID should have following roles and privileges
CREATE SESSION
CREATE VIEW
RESOURCE
4. Double click installTool.cmd in the root directory /install ( EPM System Installer Files Folder)
Note: - On Windows machines, do not use the Administrator user to install and configure
Error – EPMINS-01001 error while installing Hyperion 11.1.2.1.0
Resolution – Control Panel -> administration tools ->system configuration
Click on the Tools tab, Select ‘Change UAC settings’
Click launch
Slide the bar down to ‘’Never notify’’
Click ok
5. Follow the instructions on the installer
Select a language

Welcome and Prerequisite Checks

Choose Destination

Installation Type

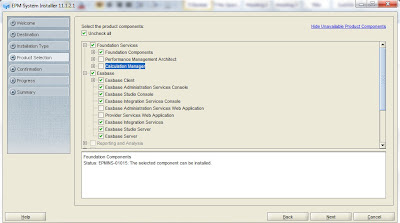
Product Selection - Foundation Services and Essbase , uncheck Performance Management Architect and all web applications
Confirmation - Installation

Progress

Installation Complete

Configure – EPM oracle instance

Configure - Shared Services Database Configuration


Configure Common Settings - windows services, SSL and SMTP Email Server settings

Configure Database

Deploy to Application Server – Specify Web Logic Domain Information

Oracle Web Logic - Application to deploy

Essbase Studio – Server data file location

Configure Essbase Server

Setup Oracle BIEE and Publisher Logical Web Address - This is an optional step

Configure Web Server

Shared Service Password - This password would be used to login to Essbase Admin Server

Confirmation - configuration

Progress

Summary - configuration complete

6. Verify Installation
Make sure that all Hyperion services are up and running

To start Essbase Server – execute following batch file via command line or start up menu
$EPM_HOME\user_projects\epmsystem1/bin/start.bat Essbase. Properties
Select Start, then Programs, the Oracle EPM System, then Foundation Services, the epmsystem1, and then EPM System Diagnostic
The Oracle EPM System diagnostic report is displaced as follows. In the first column, and PASSED or FAILED is displayed for each service. If any service displays a FAILED status, close the report and start the diagnostic again.

Thanks good one. It would also be good to provide information and screen details on migrating the cubes.
ReplyDelete